Up and running with Apache Zeppelin
Apache Zeppelin is a web-based notebook that enables data-driven, interactive data analytics and collaborative documents with SQL, Scala and more. It has great features, good support, and the platform is visually appealing and built to scale. The only issue with this solution is the lack of details and assumptions made in the documentation which makes it painful to even get started. We have built a goof-proof accelerator script to get up and running as if you knew what you were doing!
As of the time of this article, Apache Zeppelin is on version 0.7.3 0.8.0 and still in beta. The dev team has made some great progress over the past few years
introducing
Apache Shiro for multi-user authentication and building custom visualization plugins with helium. To get started, the project leads assume you're familiar
with, have access to, and want to deploy Apache Zeppelin using docker images or Amazon Web Services. For the guy trying to build a proof of concept (as cheap as possible) and see what it's all
about, this is pretty frustrating given you have to have access to and experience with other technologies and platforms. At some point, you end up so side-tracked and strung out from going down
rabbit holes that you forget what your initial goal was. My intention is to make getting started as easy as possible for the layman to check out a fantastic open source project. In this tutorial, we'll focus on a single node installation, and scale this out to multiple nodes, incorporating authentication, and installing an SSL certificate.
For this tutorial, I'm installing on a Virtual Machine (Hyper-V specifically) and have had decent performance for small to medium proof of concepts using the minimum requirements below. If you're new to Ubuntu, I suggest working with the Desktop version as it's a little easier to understand if you're coming from the Windows world and like a GUI to work with. I'll be using the Desktop version for clarity sake, the Server version is exactly the same but assumes you're comfortable with the terminal.
Minimum Requirements:
Ubuntu 16.04.03 LTS (Desktop or Server)
4 Virtual Processors
8GB of RAM
25GB of Hard Disk (Ubuntu requirement)
Assumptions
You know how to set up a Virtual Machine (see: https://youtu.be/jsDB3AsCh2k )
Admin access to this Virtual Machine
That's the only assumptions? YES! After you create a bare bones virtual machine, our installer script takes care of (most) of the rest.
Step #1 Find and use the terminal
We pick this up at the desktop of a clean install of Ubuntu 16.04.03. Open the terminal and run
sudo apt-get upgrade

wget https://raw.githubusercontent.com/techbui1ders/apachezeppelin-starterkit/master/latest/install-zeppelin.sh

chmod +x install-zeppelin.sh

sudo yes | ./install-zeppelin.sh
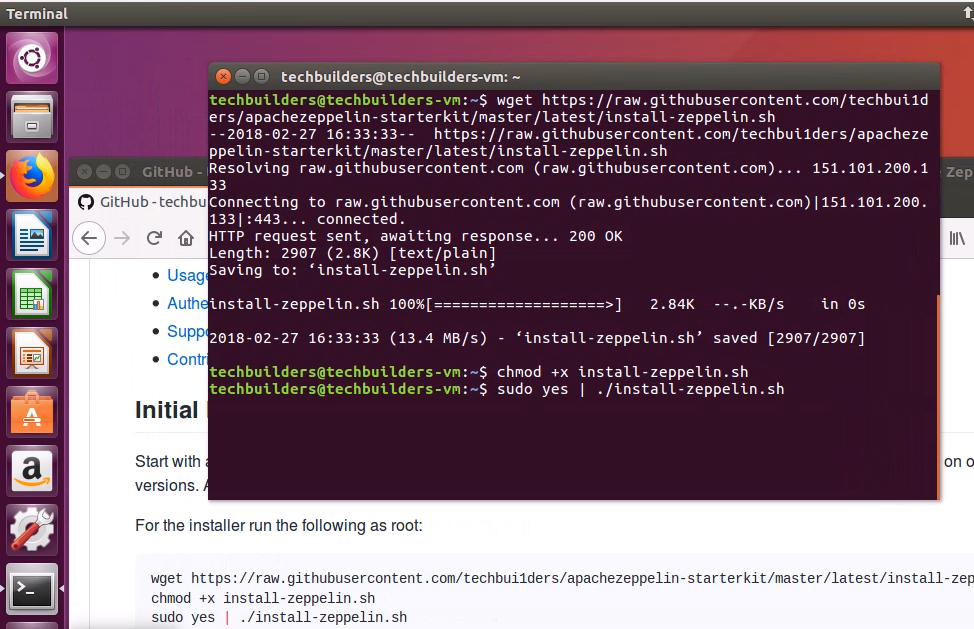
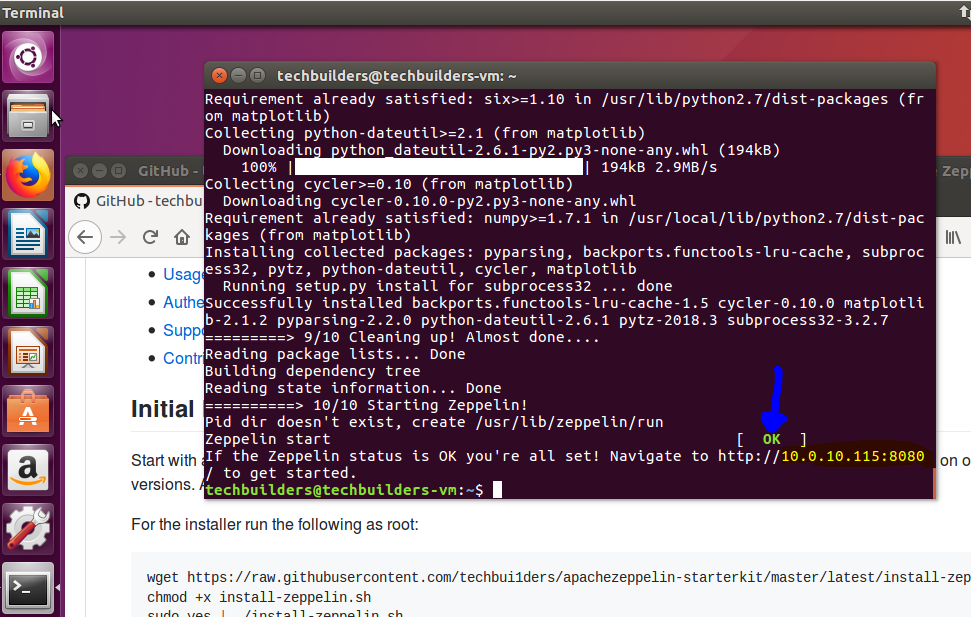
Then go and get some coffee as it's going to take a bit. Behind the scenes, it's downloading and unpacking the following (and it's dependencies) in order
        Java
        Apache Zeppelin (0.8.0 or current)
        Apache Hadoop 2.7.7
        Apache Spark 2.1.0 with Hadoop 2.7
        SparkR interpreter with handy R packages
            devtools
            googleVis
            knitr
            ggplot2
            mplot
            plotly
        Matplotlib & Numpy for Python
At the end of the install, Zeppelin will will have an OK status and a readout of the IP address and port that it's now hosted on.
If you don't see the OK and it failed, check to make sure you have Java installed with
$ java -version
If there is no version listed, install java and run the following to restart Apache Zeppelin
$ sudo apt-get install default-jdk
$ /usr/lib/zeppelin/bin/zeppelin-daemon.sh start
Step #2 Take flight
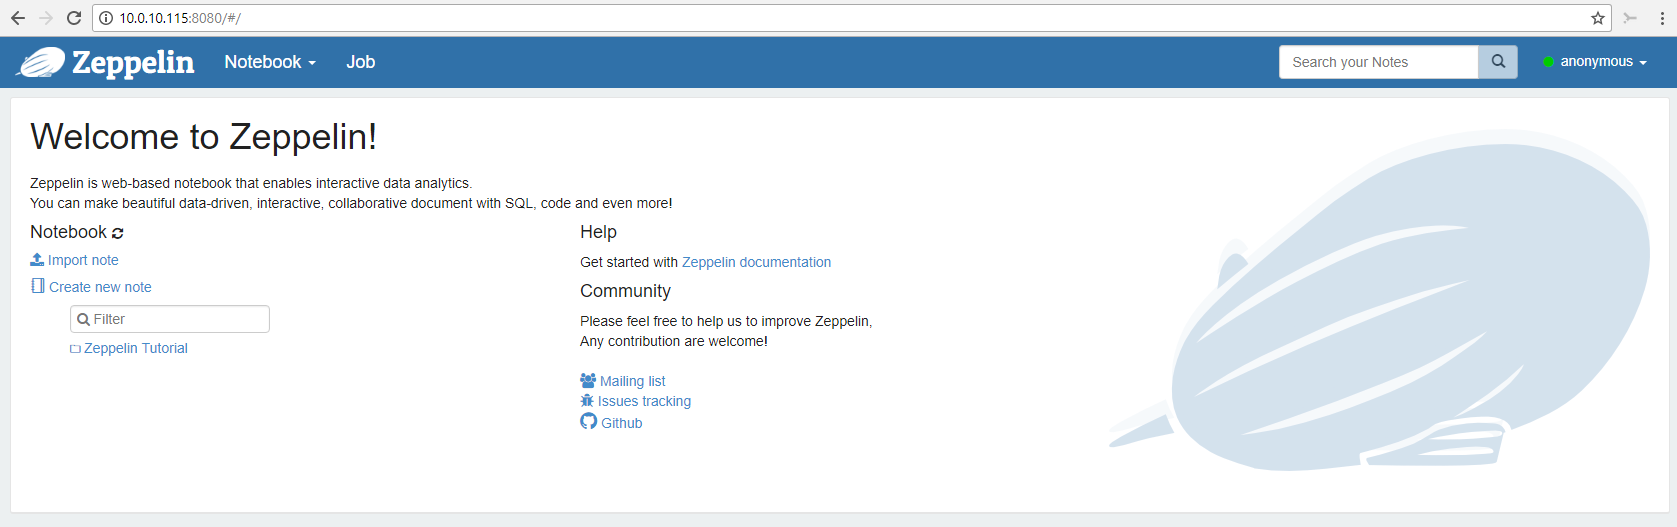
At this point, the engines are warmed and you're cleared for takeoff. Step outside of your virtual machine and browse to the IP address listed during the install. If you missed the IP address. Check it again using
$ ifconfig
Look for the 'inet addr:' and then use that address plus the port 8080 to get started.
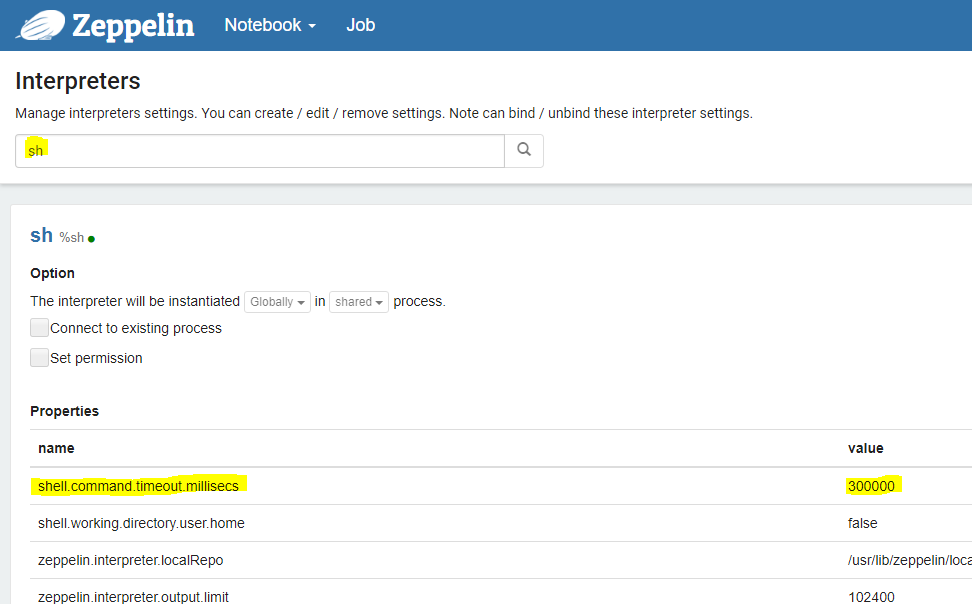
From here, we have one slight adjustment to make in an interpreter to have the tutorials flow smoothly. You're currently signed in as 'anonymous', click the user name in the top right hand corner and a dropdown will appear, click 'interpreter' and search for 'sh'. You'll need to modify the shell.command.timeout.millisecs from 1 minute (60000 milliseconds) to a few minutes (3000000)
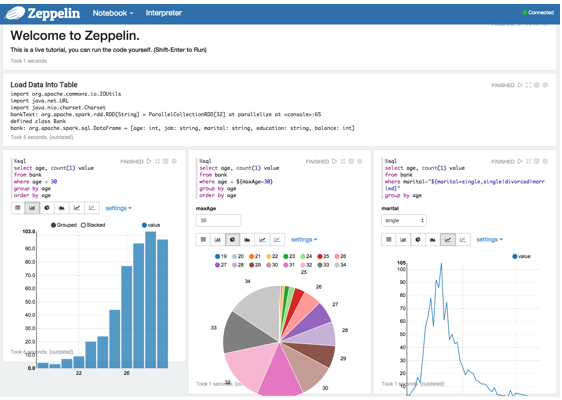
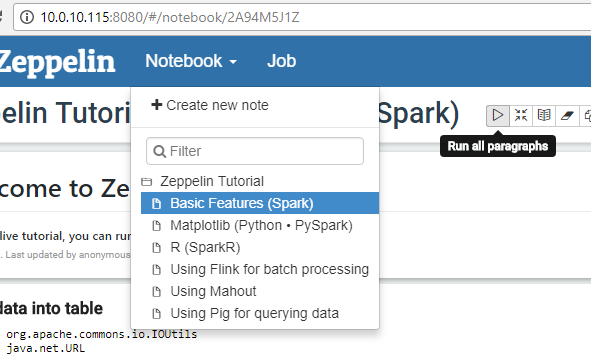
Now you're all set to begin! Go into the Zeppelin tutorial and run all paragraphs for the first four tutorials to make sure the interpreters and corresponding libraries are installed and running correctly. The R tutorial is more visually appealing and tends to give you a good basis for what can be done.
The 'Using Mahout' and 'Using Pig for querying data' tutorials don't work out of the box (testing before deployment is hard...mmmk!). We'll spend some time correcting these issues in the install script and will update when completed.
From here, I would get familiar with the interpreters and creating / sharing notebooks. Understand how to edit the variables in the interpreters and how that factors in as you'll need to be comfortable changing this configurations to scale this platform out. Since you've installed Ubuntu Desktop, take some time to visually go to the Zeppelin configuration folder paths (specifically zeppelin.home) to see the files and information contained within them.
Step #3 Go into Orbit
If you don't have an S3 bucket already, set up an S3 bucket and place a CSV into it and connect Zeppelin using your favorite interpreter to do some data manipulation and plotting with it. After this point, you should be pretty comfortable with the basics of a single node installation of Apache Zeppelin installed. Below are some useful links to start the learning process with how to scale this out.
What's Next?
So we've installed Apache Zeppelin on a single node with anonymous authentication. We need to take this from POC to a solution that's a bit more enterprise. Our next articles on Apache Zeppelin will contain tutorials on Apache Shiro for authentication and connecting multiple nodes for more processing power. Hope you've enjoyed! Please comment with any questions.
Comments (0)
Leave a comment